Halloween Pumpkin Amigurumi · Pumpkin Pillow · Free Crochet Pattern
And we finish the Halloween series with this beautiful pumpkin! Super kawaii and perfect for decorating your living room, the little ones' bed, or even your own during this season. You can skip the face if you're looking for a less childish detail to decorate any part of your house, or use different colors... let our imagination be limitless!
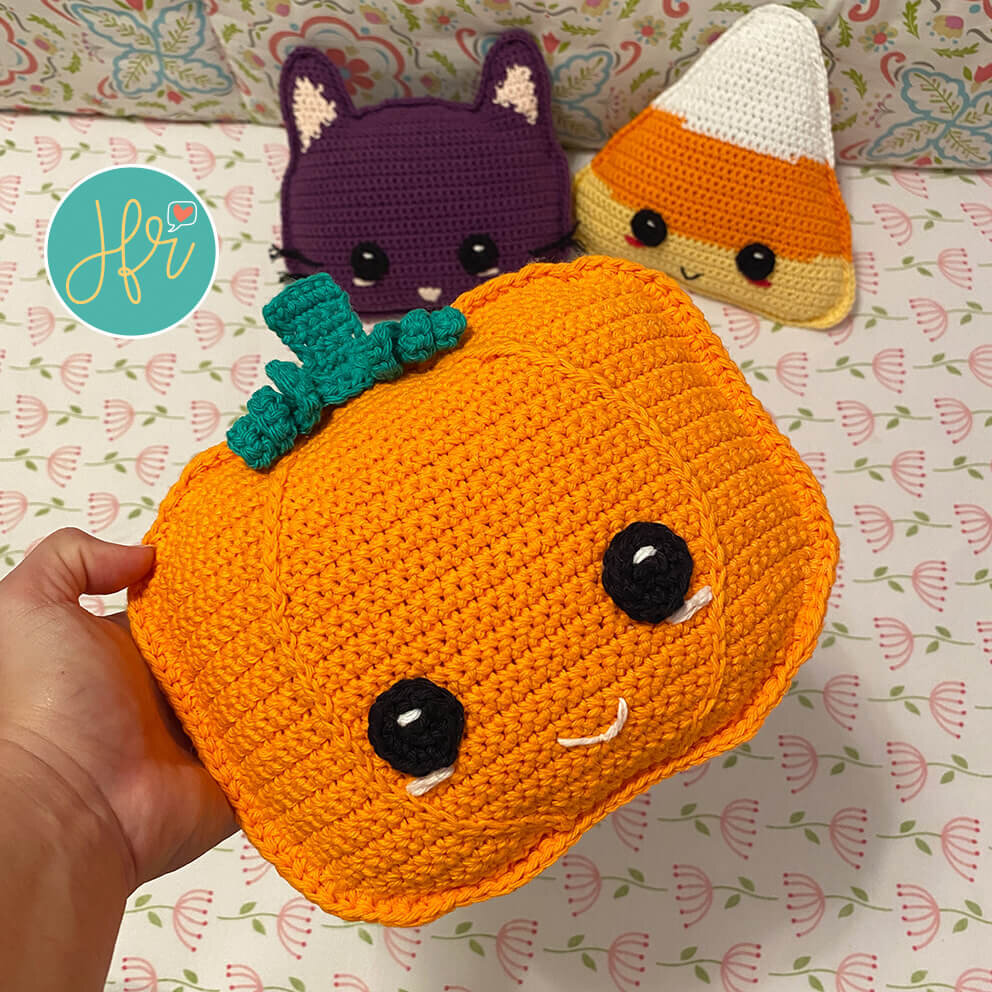
This is the last Halloween design, completing this series alongside the Candy Corn pillow and the Kitty pillow, all very kawaii!! I hope you decide to make them, and please tag me in your Instagram or Facebook posts by adding: Pattern by @juliefruuu #juliefruuu; leave me your comments, and if you know someone who would love this pattern, share it with them!!

This post may contain affiliate links, which means that Juliefruuu may receive some compensation if you click on the links and purchase something we have recommended. Clicking on these links will not generate any additional cost for you, but it will help keep this page active and full of more ideas and free patterns! Thank you!!!
Materials
Lily Sugar ‘N Cream cotton yarn in orange and green. A little bit of black for the eyes and pink for the details.
4.5 mm crochet hook
Poly Fil premium fiberfill
Yarn needle
Scissors
Instructions
In the pattern, I will use the following abbreviations:
N – Orange
Am – Increase: make two stitches in the same stitch.
Dm – Decrease: make one stitch by joining two stitches together.
Mpa – Half double crochet: yarn over and pull through the base stitch, leaving 3 loops on the hook. Yarn over again and pull through all the loops on the hook.
Cd – Chain
The panels for this amigurumi pillow, as I call it, are made only with single crochet, increases, and decreases. So in this pattern, I will list the number of single crochets, increases, and decreases with a letter representing the color you need to use. For example: N2, which means make two single crochets with orange yarn (N). Or Vdm, which means make a decrease (dm) with green yarn (V).
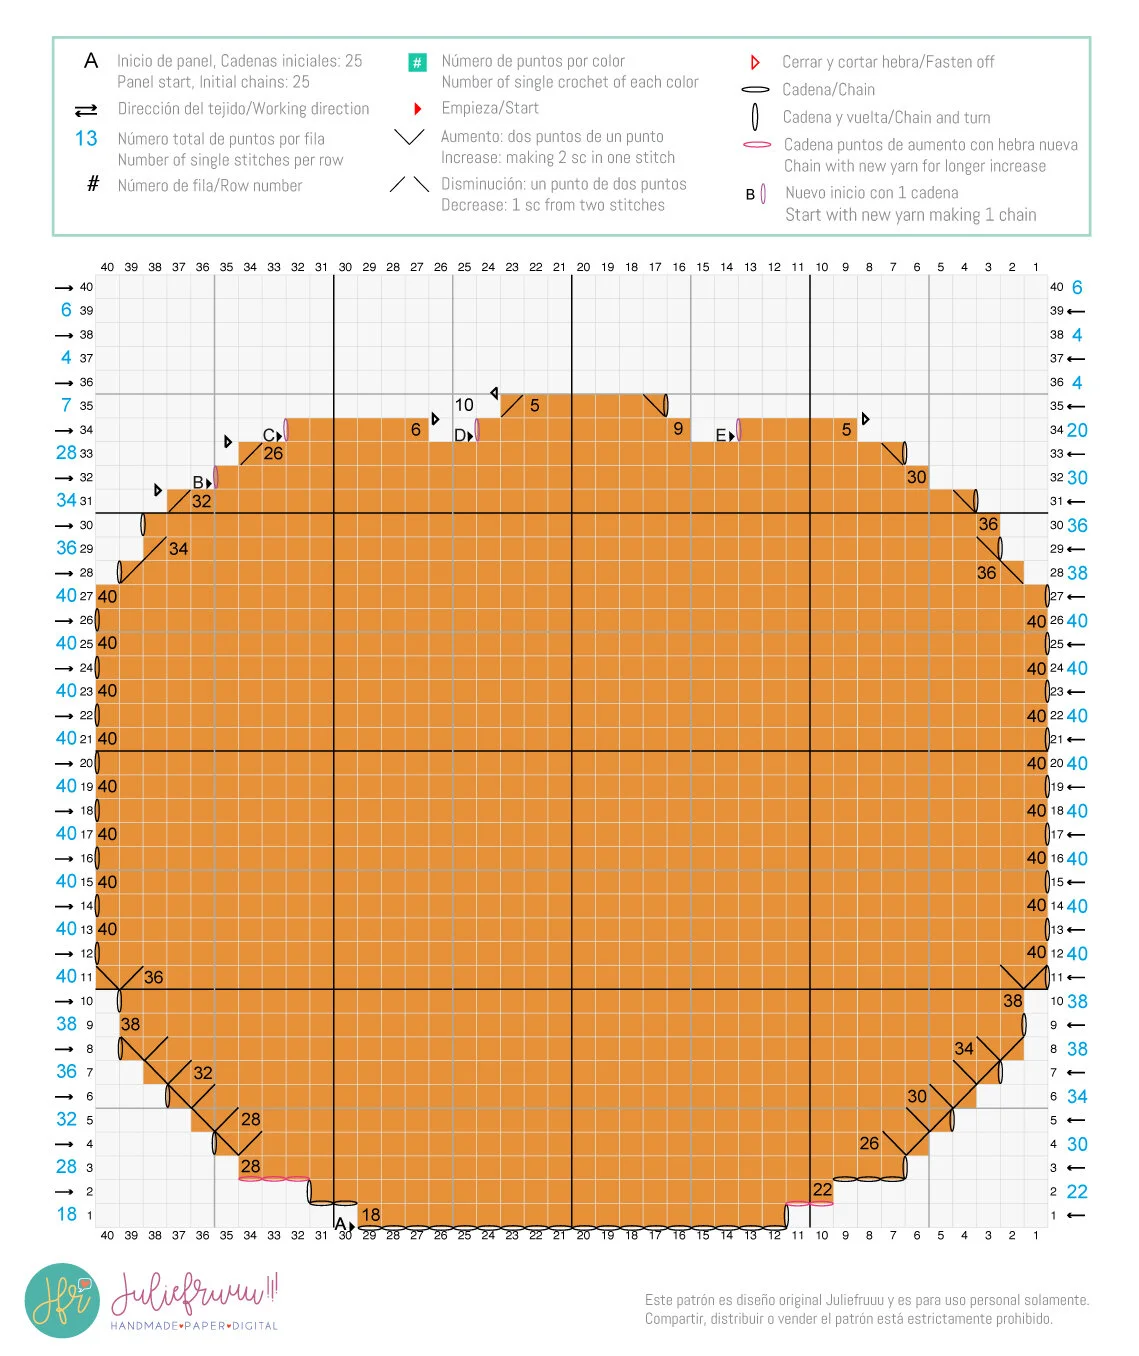
At the end of each row, you will see a number in parentheses, which represents the number of stitches you should have at the end of the row. For example, if you see (12), it means that when you finish following the instruction for that row, you should count 12 stitches, and an arrow will indicate the direction of the work. From row 34 onwards, it will correspond to the sum of the stitches of the 3 parts worked in each row. For example, in row 34, the total number of stitches is 20 single crochets.
If you need help with how to do increases of two or more stitches, you can watch the video tutorial for this cross, where I explain how I do them. Always cut a piece of yarn of the color you need for the increases before starting and have it on hand for when you need it. In this project, we only use orange yarn for the increases.

Let's start crocheting!
Pumpkin Pillow
Make 2 panels
We will work the panels from bottom to top. After each row, always make a chain and turn. Don’t forget to cut and save a long piece of yarn for the increases.
Make a slip stitch and 19 chains, turn, and start from the second chain from the hook with:
N18 (18), 3 chains, turn, start from the second chain from the hook with <−
N20. Join the yarn we reserved earlier to the last stitch, make 2 chains, and cut the yarn. Continue crocheting the last 2 N2 (22), 3 chains, turn, and start from the second chain from the hook with −>
N25. Join the yarn we reserved earlier to the last stitch, make 3 chains, and cut the yarn. Continue crocheting the last 3 N3 (28) <−
Nam, N26, Nam (30) −>
Nam, N28, Nam (32) <−
Nam, N30, Nam (34) −>
Nam, N32, Nam (36) <−
Nam, N34, Nam (38) −>
N38 (38) <−
N38 (38) −>
Nam, N36, Nam (40) <−
12-27. N40 (40) −>... <−
Ndm, N36, Ndm (38) −>
Ndm, N34, Ndm (36) <−
N36 (36) −>
Ndm, N32, Ndm (34) <−, close and cut yarn.
Join the yarn in the third stitch and make N30. Remember that every time we join yarn, we make a chain, and the first single crochet is made in the same stitch where we joined the yarn. (30) −>
Ndm, N26, Ndm (28) <−, close and cut yarn.
Now, we will finish the top part of the pumpkin with orange in 3 parts, and then continue with green.
Respecting the direction of the crochet (−>), join yarn, leaving two stitches unworked, and make N6, close and cut yarn.
Join the yarn again, leaving 2 stitches unworked, and make N9, make a chain, and turn the work to continue with:
Ndm, N5, Ndm (7) <− , close and cut yarn.
Continue...
Now, go back to row 34, respecting the direction of the crochet (−>), join yarn, leaving two stitches unworked, and make N5, close and cut yarn.
Once you finish the second panel, you can choose not to cut the yarn and continue joining the two panels. However, due to the shape of this pillow, I preferred to cut the yarn and join the panels on the side so that it’s easier to stuff and the pillow turns out better.
Pattern Chart
Eyes (Make 2, Black)
Magic ring, 6 sc (6)
6 inc (12), close and leave a long tail for sewing. (Or if you're like me, cut and then glue them with hot glue hehe).
Embroider a white dot on each eye with white thread.
Stem (Green)
Make 5 chains, turn, starting from the second chain from the hook with sc in each stitch.
sc 4 (4) <−
sc 4 (4) <−
3-5. sc 4 (4) −>... <−
inc, sc 2, inc (6) −>
sc 6 (6), close and secure the yarn.
Vines (Green)
Make two vines: one with 19 chains and the other with 13 chains, turning and working 2 sc in each stitch. We will end up with 36 and 24 stitches respectively. Cut the yarn and secure the ends with a knot using the starting and ending tails of each piece.
Assembly
Once the panels and eyes are ready, lightly mark with a fabric pencil or regular pencil (like I do hehe) where the surface stitches will go, starting from the ends of the center part of the pumpkin downwards. (Sorry! I always forget to take pictures of the process. I promise I’ll get better at that!)
The surface stitches will go from the bottom to the top. Make a slip stitch with the yarn you’re going to work with, join it to the bottom of the panel (A), and continue upwards following the guide you traced, ending at point B. Do this on the second panel as well, keeping in mind which side will be on the outside when you join the pieces.

You can either place and sew the eyes into position now, or like I did, glue them at the end. Use the photo as a guide to embroider the pink lines below the eyes, securing the thread with a knot at the back.
Embroider the nose between the eyes, but two rows lower. When finished, secure the thread with a knot at the back. For the whiskers, cut 6 pieces of thread about 15 cm long. Fold each strand in half and decide where the whiskers will go. Using a crochet hook, pass the loop through a stitch and then back through the continuous stitch. Pass both strands through the loop and tighten. Don’t worry if the whiskers are long, leave them like that for now.
Joining the Panels
Place the panels on top of each other to start assembling your pillow. Join the yarn, make a chain stitch (cd), and continue with half double crochet (mpa) through both panels. When you reach the stem area, place it between the two panels and join all 3 pieces at the same time with single crochet (sc). Continue with mpa around the edge until you leave an opening of about 10 cm.
Filling
Fill the pillow, gradually adding more stuffing while continuing to join the panels until it is completely closed. Join the first stitch with a slip stitch and secure the yarn. Before closing completely, I give the pillow a few gentle taps and mold it well, trying to fill the corners and seeing if I need to add or remove some filling.
Details
Finally, with a little hot glue, I attached the vines near the stem. If you prefer, you can sew them on. Done!! This Halloween trilogy is complete!!!! Now, let’s start thinking about what we’ll make for Christmas!


I'm glad you liked this pattern! Which one will we make next? You'll see soon! And if you decided to make it, I'd love to see it. Please tag me in your Instagram or Facebook posts with:
Pattern by @juliefruuu #juliefruuu
Thank you! And if you have any questions, feel free to message me!
And if you liked it, share it!
Kisses!
The information and photos in this post are the property of Juliefruuu. You may not copy, paste, or reproduce this content in full or in part—digitally, verbally, in writing, or in any other form—including translations.
You are welcome to sell the products you make using these patterns, as long as you give proper credit for the design and pattern to Juliefruuu. Please tag your posts with @juliefruuu and #juliefruuu, and link back to this post.
This post may contain affiliate links, which means Juliefruuu may receive a small commission if you click on them and purchase something we've recommended. Clicking on these links does not cost you anything extra, but it helps keep this page running and full of more free ideas and patterns! Thank you so much!!!

Hey! Gracias por pasar por aquí, soy Julissa, alias Juliefruuu y espero ayudarte a crear tu propio mundo creativo! Te animaste hacer este patrón? Si! Porfa etiquetame @juliefruuu en tus publicaciones y déjame verlo! Entonces… qué proyecto empezamos ahora?? ;D
Que tal estos…


No te pierdas de nada!
Suscríbete y recibe una notificación a tu mail cada vez que suba un patrón nuevo!
Nos vemos en instagram!


