Fortune Cookie for Valentine's Day · Free Crochet Pattern
Valentine's Day is coming! That's why I want to share this idea I had to bring a smile to anyone you want! It could be a nice surprise for your significant other or your best friend! Actually, for anyone! It all depends on the message inside!

This project is super simple and it's truly a beautiful little gesture that will steal a big smile from whoever receives it! I’ll show you how to make the message come out and be placed back into the cookie, but if you want the message to just come out once, you can skip that step and just place your message inside before sewing the cookie together.
This post may contain affiliate links, meaning Juliefruuu may receive some compensation if you click on the links and buy something we've recommended. Clicking these links does not cost you anything extra, but it helps keep this page active and full of more free ideas and patterns! Thank you!
Materials:
Lily Sugar 'N Cream cotton yarn in jute, pink, coral, or any color you want!
4.5 mm crochet hook
Yarn needle
Hot glue gun
Scissors
Paper and printer (if you want to use the phrases I share)
I made this video detailing the steps to make it, and I’ll leave the written version below.
Instructions
In the pattern, I will use these abbreviations:
Pb: Single crochet (sc)
Am: Increase: make two stitches in the same stitch.
At the end of each row or round, you will see a number in parentheses. This number represents how many stitches you should have at the end of that row or round. For example, if you see (12), it means that after completing the instructions for that row or round, you should count 12 stitches.

Let's start crocheting!
Fortune Cookie · Valentine's Day
Cookie
We will work in continuous rounds.
Magic ring, 6 sc (6)
6 increases (12)
1 sc + 1 increase x 6 (18)
2 sc + 1 increase x 6 (24)
3 sc + 1 increase x 6 (30)
4 sc + 1 increase x 6 (36)
5 sc + 1 increase x 6 (42)
6 sc + 1 increase x 6 (48)
7 sc + 1 increase x 6 (54), leave a long tail for sewing the cookie.
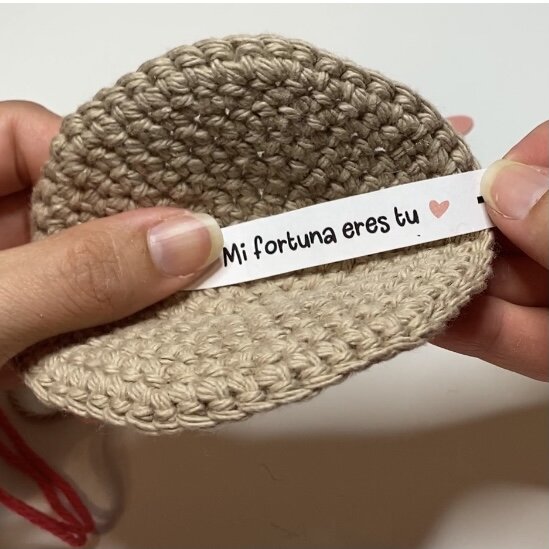
Now that the base of the cookie is ready, set it aside for now and cut the phrase you want to use and the heart that will be on top. You can download the PDF with several options here. Phrases like "You have an admirer," "My fortune is that you are my best friend," or "Will you marry me?" or "Dessert is eaten in bed" haha, and I left one blank so you can write your personal message if you want!
TIP: To give the paper extra protection, stick clear tape over the phrase you’ll be using before cutting. I don’t recommend printing on cardstock because it’s too stiff and will make it difficult to move inside the cookie.
To cut the heart, fold it in half first, holding it up to the light so you can make sure the back side is aligned with the front and you can cut both pieces at the same time.

Fold the message on the left side and round the corners by cutting with scissors. Then, attach a strip of thread— I used a different color, but you can use the same one you used for the cookie. The thread should be longer than the length of the cookie, folded in half.

We measure the message inside the cookie, leaving the arrow pointing outwards, and tie a knot in the thread as a stopper so that when we pull the thread to store the message, it doesn’t go too far and fully enters the cookie. Make sure the long end of the thread from the cookie remains on the side where the message thread exits.
Using a yarn needle, we stitch the two sides together with the long thread left at the end of the cookie. When stitching, pass the needle only through the outer strands. Once closed, secure it and weave in the end. Carefully fold the cookie and secure it with a drop of hot glue.

Carefully pull out the message until the entire phrase is visible, then attach the heart to the thread and trim any excess. The heart acts as a stopper to ensure the message doesn't slide all the way out of the cookie, allowing you to tuck it back in.

Your fortune cookie is ready!!!
I hope you liked this pattern! If you decided to make it, I’d love to see it. Please tag me in your Instagram or Facebook posts with:
Pattern by @juliefruuu #juliefruuu
Thank you! If you have any questions, feel free to message me!
And if you liked it, share it!
Kisses!
The information and photos in this post are the property of Juliefruuu. You may not copy, paste, or reproduce this content in full or in part—digitally, verbally, in writing, or in any other form—including translations.
You are welcome to sell the products you make using these patterns, as long as you give proper credit for the design and pattern to Juliefruuu. Please tag your posts with @juliefruuu and #juliefruuu, and link back to this post.
This post may contain affiliate links, which means Juliefruuu may receive a small commission if you click on them and purchase something we've recommended. Clicking on these links does not cost you anything extra, but it helps keep this page running and full of more free ideas and patterns! Thank you so much!!!

Hey! Gracias por pasar por aquí, soy Julissa, alias Juliefruuu y espero ayudarte a crear tu propio mundo creativo! Te animaste hacer este patrón? Si! Porfa etiquetame @juliefruuu en tus publicaciones y déjame verlo! Entonces… qué proyecto empezamos ahora?? ;D
Que tal estos…


Nos vemos en instagram!


